"We often take the technology at our fingertips for granted, forgetting the power we have to memorialize what we are living, what’s around us. Take that photo! Get past yourself, past the ego, past the fear of whether it's good enough or what will people think — and press the button."
– Molly Olwig, Photographer at Artifact Uprising
A Simple Guide to
Photography Basics for Better Photos

Photography has become a ubiquitous pursuit in the recent decade, thanks to our mobile devices and visually driven social media platforms. And while so much of what we see published in our feeds is beautiful, many of us turn to our own camera rolls with contempt at our own ability to match those aesthetic standards. But no matter where you are in your photography journey, there will always be more ways to learn and experiment.
For those in the beginning stages of developing this art and skill, we're highlighting a few photography basics and beginner photography tips to guide you on how to take better pictures — of the people you love, places you go, and the moments you want to make last.
Tip 01
Clean Your Lens

This may seem simple — and it is. You'd be surprised at the difference in sharpness a clean lens will give you, compared to one with smudges. It doesn't matter what kind of camera you have: the lens is arguably the most important part. It determines the quality of your image more than any other component, so don't let a little dirt, fingerprint, or watermark get in the way.
Some Tips for Cleaning Your Lens
- Phone camera lenses can be wiped down with a simple microfiber cloth. Use a folded corner of the cloth to clear the edge of the lens, and for tough smears, add a bit of distilled water.
- DSLR lenses have a more involved and nuanced cleaning process. We recommend diving deeper to learn the proper steps to take with tools like soft brushes or air blowers for dust, lens cleaning solutions, microfiber cloths, and more.
Tip 02
Use Your Feet

Among our tips for taking photos, this might be the easiest! When trying to close the distance between your camera and your subject, always default to physically moving your body closer before zooming, cropping, or other photo editing. This is because the more work your camera does to get closer, the lower the image resolution and quality your photo will usually have. Once you've moved toward your subject as far as you can, that's a good time to supplement your shot with the zoom feature, if necessary.
Tip 03
Consider Composition
Symmetry

A basic guideline for composition, symmetry is one that most new photographers can innately understand. Consistency and balance between two halves of the image — the left and right (horizontally) or top and bottom (vertically) — bring a sense of wholeness and visual harmony. When looking for symmetry, aim to have equal spacing surrounding your subject, place points of interest so that one side isn't too cluttered, or even using a reflective surface like water, to your advantage.
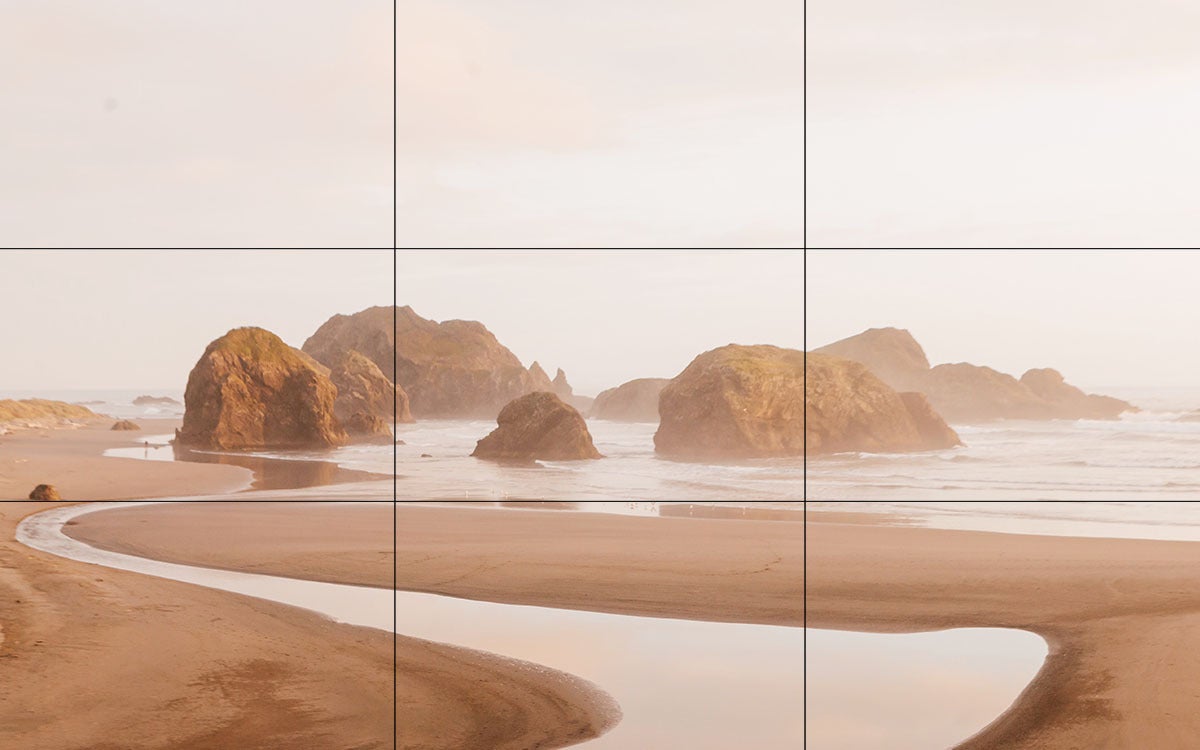
Rule of Thirds

Imagine your frame is divided into equal thirds, both vertically and horizontally, so that the image contains a 3 x 3 grid. This visual guide immediately helps photographers take more dynamic photos by encouraging them to place the subject along those lines or at their intersection points. Oftentimes, our natural inclination is to place our subject at the center of the photo. To keep things interesting or when a symmetrical balance is out of the question, the rule of thirds is a handy compositional practice.
Leading Lines

Another way to take an engaging photo is by incorporating the leading lines technique. This involves the use of lines in your composition, whether it's a tunnel or maybe a river, to draw the viewer's eye to the focal point. Because our eyes are naturally drawn toward and along lines, they play a key role in your photo's storytelling. As you begin to play with lines in your photos, you'll find yourself creating dimension and focus, a concept known as depth of field.
S Curves

Add a sense of movement and dimension with a simple curved line or objects plotted through your image in an "s" shape. Similar in concept to leading lines, this composition technique influences how the viewer's eye travels throughout your photo, and has the power to create depth from front to back.
Tip 04
Go Plain for Portraits

When taking a portrait or photo focused on people, try to find a basic background that doesn't distract from the main attraction. Look for a wall or backdrop consisting of a simple color scheme and consistent texture. This will help you avoid clutter and complexities that will draw the viewer's focus from the people and emotions that you're capturing.
Tip 05
Get It Straight

A very easy way to take a higher quality photo is simply to steady your hands and foundation. You can guide your own eye to take a straight photo by finding naturally occurring, perpendicular lines, like an ocean horizon or a building's vertical edge, to which you'll align your frame. Of course, you may always straighten and rotate your image in an editing tool after it's taken, but keep in mind that doing so requires cropping out more of your photo and therefore decreases its size.
Pro tip: If you're using a DSLR, this is where a tripod comes in handy to aid in stabilization!
Tip 06
Stay in Focus

Focus in photography is akin to sharpness. You can determine what in your frame is in focus versus what appears blurry by selecting the spot for your lens to concentrate. From there, a clear point of interest will take shape in your frame, then your lighting and depth of field will adjust accordingly in most automatic modes. Once you've applied the preceding tips, this is a quick way to learn how to take good photos with your phone or any camera. On a phone, it's as simple as tapping the subject on your screen so it comes into focus. With a point and shoot camera, hold the button halfway down so it can detect the subject, then press fully to take your shot.
Tip 07
Avoid Direct, Harsh Light

Understanding how to photograph light is the key to better photos — light and shadows give your images contrast and dimension. When you shoot under harsh, direct light (e.g., high noon), it washes out your shadows, details, and contours of what's around you. Instead, aim for "golden hour," when the sun is rising or setting. Or, find a shadow to shoot within in order to create aesthetic angles and a softer glow.
Tip 08
Know When to Use Flash

If you've experimented with flash, you've seen how it can make or break a photo. When used correctly, it can help illuminate your photo properly and balance out other light sources (or lack thereof); but when used incorrectly, it can drown the empty space in front of you or overexpose what's in your photo. Here's our advice for how to take good photos with flash: turn it on when subjects are backlit or there are deep, unflattering shadows from another light source. Keep in mind your flash's range so you're aware of how far you need to stand from your subject for optimal brightness.
"I’ve had so many people ask me the hardest part of photography. The answer, at its simplest: you’ve got to click the button. Of course there are techniques, tools, and post production processes that can further develop your photography, but it starts with doing it."
– Molly Olwig, Photographer at Artifact Uprising
Give It a Try
Did These Photography Basics Click?
Starting with these beginner photography tips will give you a solid foundation for improving the look of your camera roll. We can't wait to see how you use them! Just tag us on Instagram (@artifactuprising) or use #TellOn.
Want to keep the tips coming? Continue reading to find out how to take good photos with your phone or check out our guide to printing your phone photos. And don't forget to...


